Alerting
Keep track of any significant changes or anomalies in your Qlik Sense data. When new incidents arise, share them immediately with teams by setting up unique rules and timings for alerts.
Introduction
This documentation helps you get started with Alerting and explains where to find the information you need.
Setting up Alerting
This Session will help you to deploy the SenseOps Alerting in the same machine where the Qlik sense central node is installed.
Prerequisite
● Local Admin right with user credentials
● Node JS need install
● Postgres DB & PGAdmin
● QS Postgres Repository Username & Password, if PG DB Already installed
● Qlik Sense Certificates (Path)
● New Database for Alerting (Create the New Database in the postgres with name of "Alerting").
● New virtual proxy for alerting (This will be taken care of while doing the installation).
● SMTP Connection Details (for email configuration)
● Domain URL/System Name for QS Hub
● SSL Certificate (If need to access as https)
● SenseOps Alerting Installer (Zip file).
● The following ports need to be opened in the firewall
      ● 4000
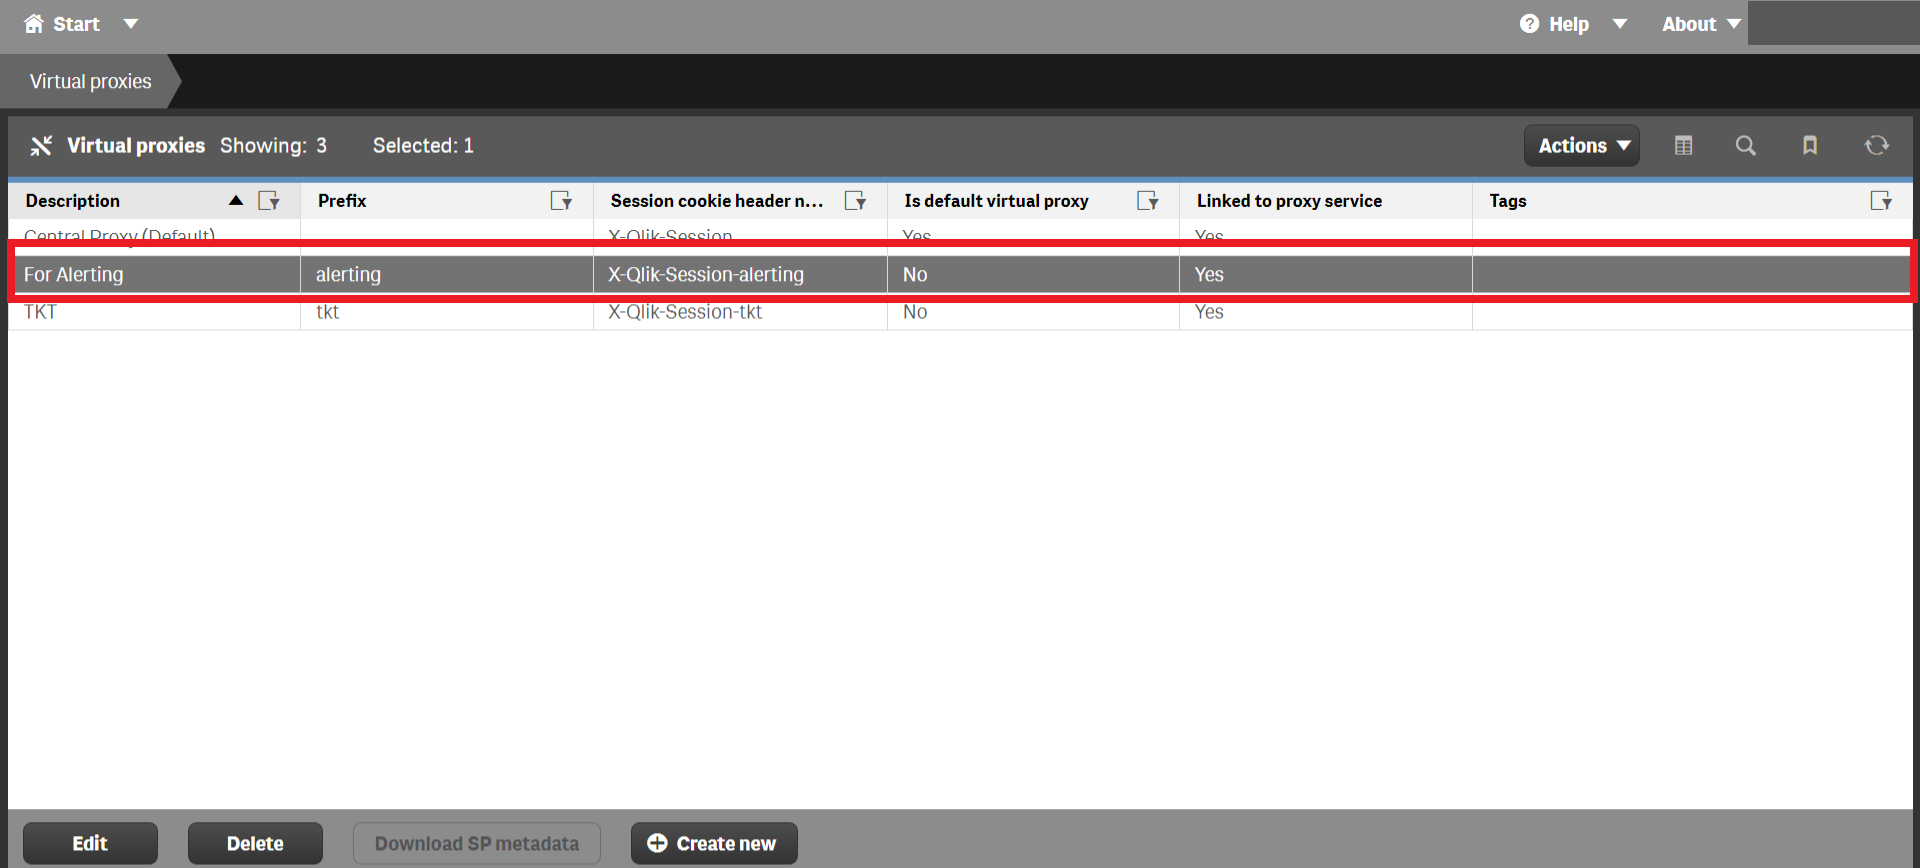
Virtual Proxy Setup
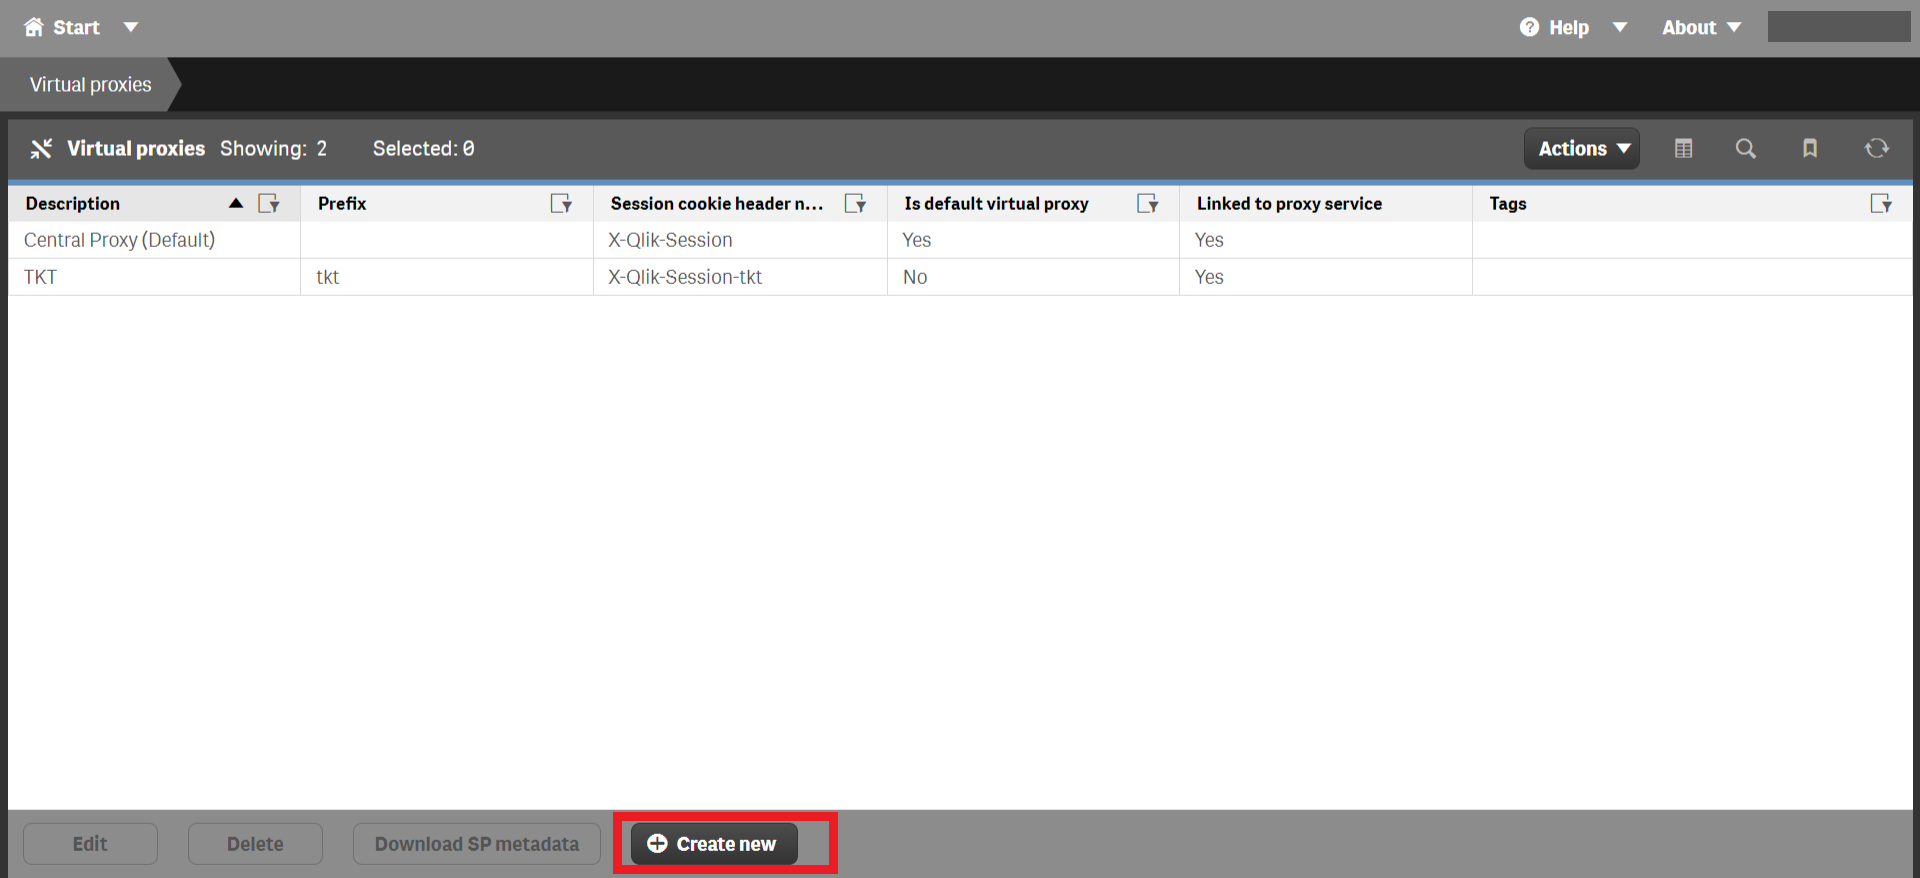
Do the following step to set up the virtual proxy for alerting.
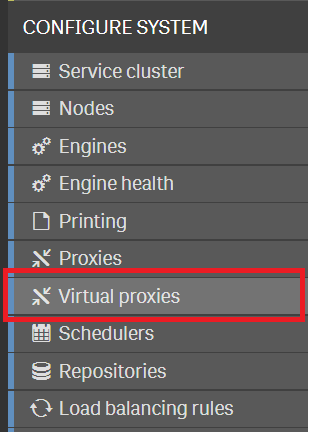
● Log on to the Qlik Sense Management Console and locate Virtual Proxies in the left side menu.
● Click Create New
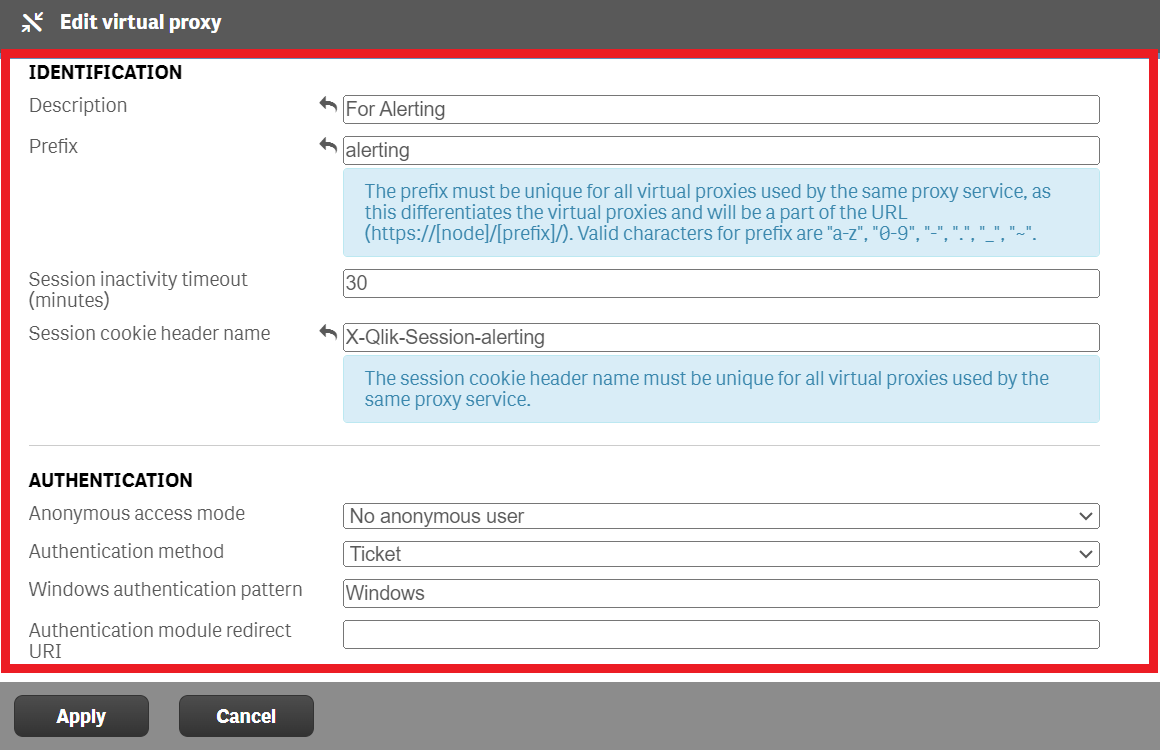
- Enable the basic Properties in the right hand panel.
- Fill out the proxy settings with the following information:
- Prefix: alerting
- Cookie Header: X-Qlik-Session-alerting
- Authentication Mode: Ticket
- Prefix: alerting
- Adding load balancing node

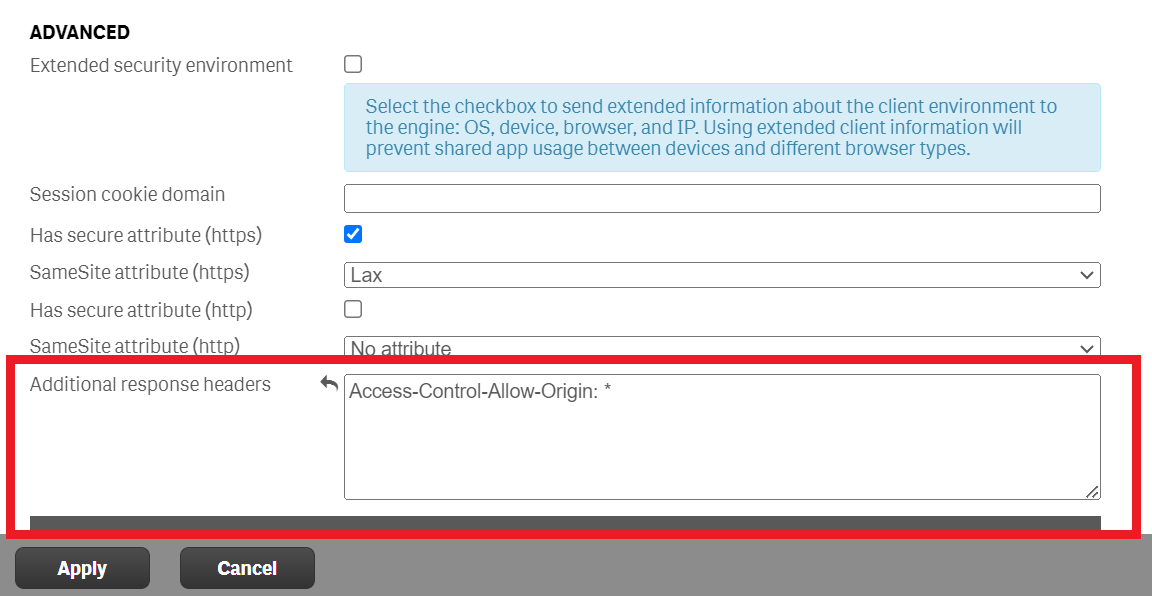
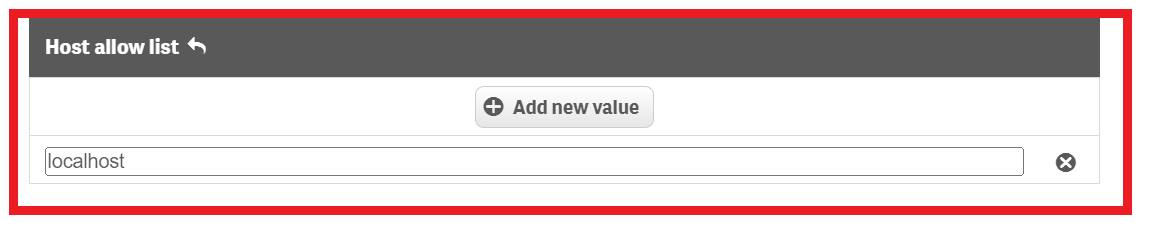
- Set the additional header and whitelist the domain name
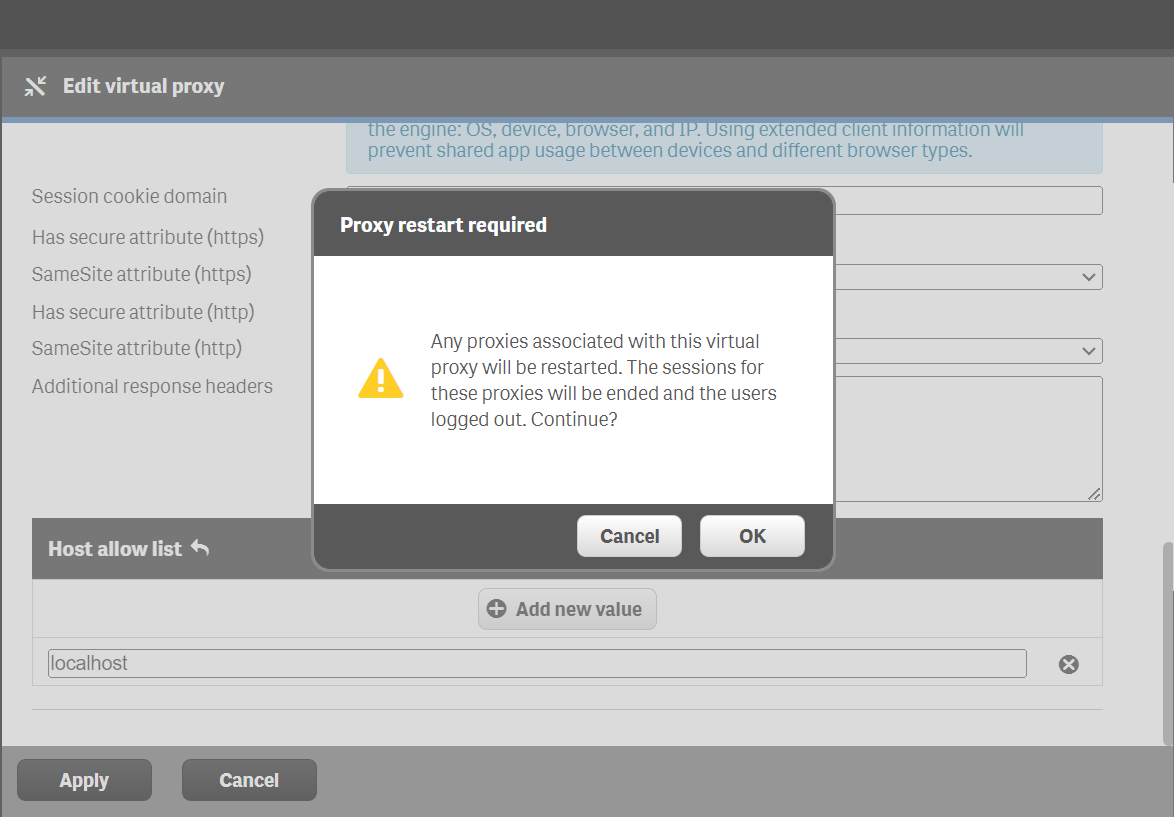
- Click Apply
- Confirm a Proxy restart.
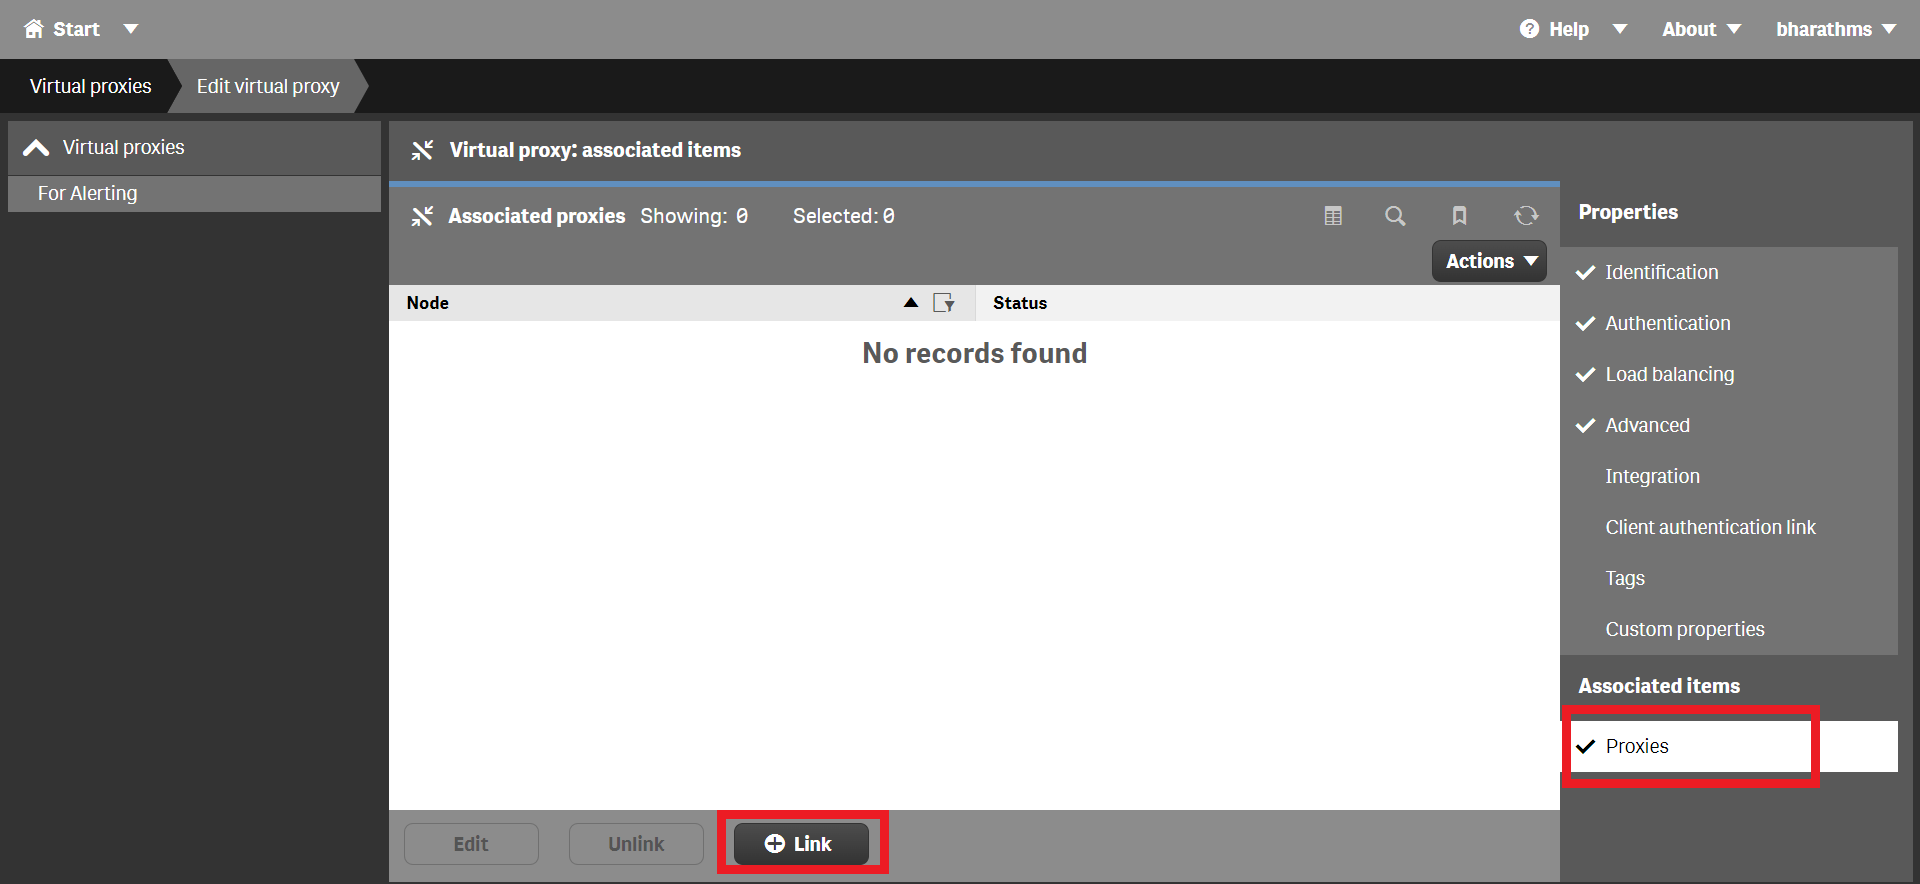
- After all settings have been applied a new menu is available in the bottom right menu.
- Locate Associated items and click Proxies
- Click Link
- Choose the Proxy used for this Virtual Proxy
- Click on the Link
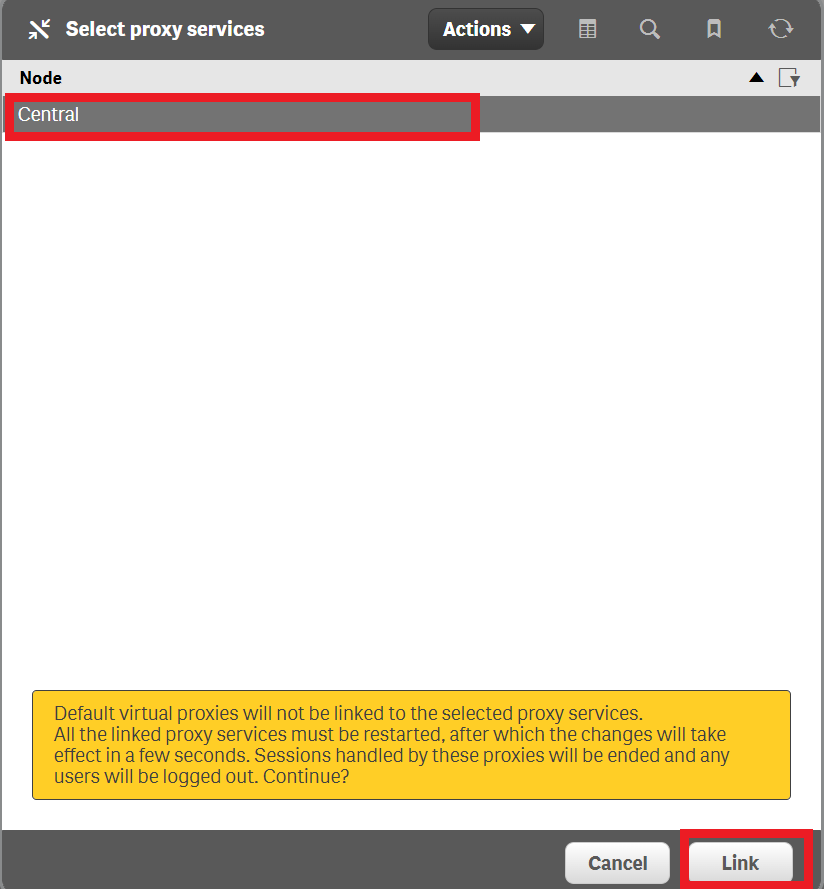
- you should see it listed among the existing virtual proxies in the Qlik Management Console (QMC). This newly created virtual proxy can now be utilized for alerting purposes.
Alerting Installation
Step 1:
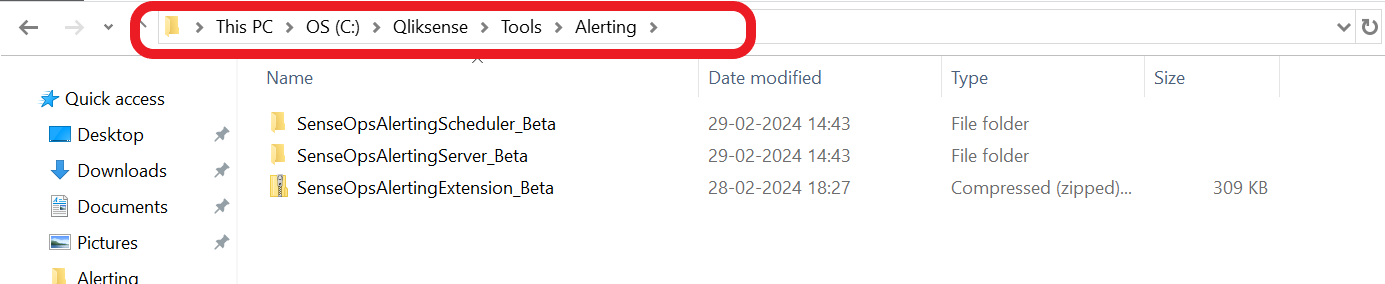
Login to the https://account.senseops.com/login portal and download the SenseOpsAlerting_Beta package. It will be downloaded in a zip format. Following files will be available upon unzipping.
SenseOpsAlertingExtension_Beta.zip- SenseOps Alerting extension fileSenseOpsAlertingServer_Beta folder- SenseOps Alerting server fileSenseOpsAlertingScheduler_Beta folder- SenseOps Alerting scheduler file
You need to move the extracted folder to the Qlik share folder. Refer the below path:
Go to \< QlikShare >\Tools\ folder (create folder if it does not exist) and within that "SenseOps Alerting" as a sub folder. Paste the all copied files here.
Step 2:
SenseOps Alerting - Extension Installation
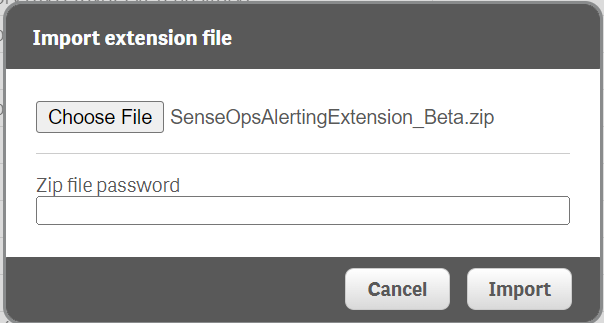
- Login into QMC (Qlik Management Console) and go to Extensions. Import the SenseOpsAlertingExtension_Beta.zip file.
Step 3:
SenseOps Alerting - Server Installation
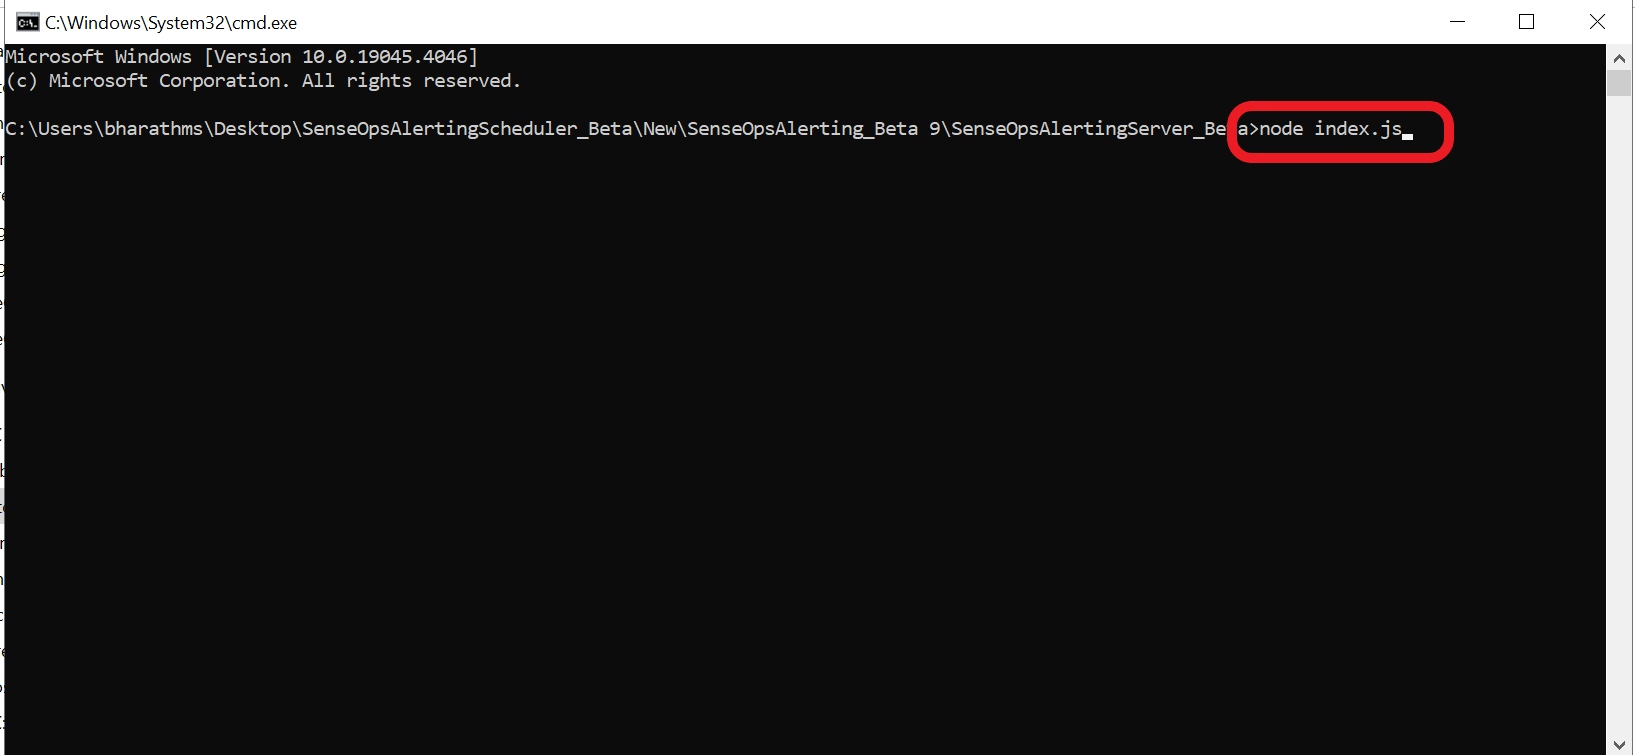
- Go to the file path: QlikShare/Tools/SenseOps Alerting/SenseOpsAlertingServer_Beta, open the command prompt with administrator privileges, type node index.js and hit Enter.
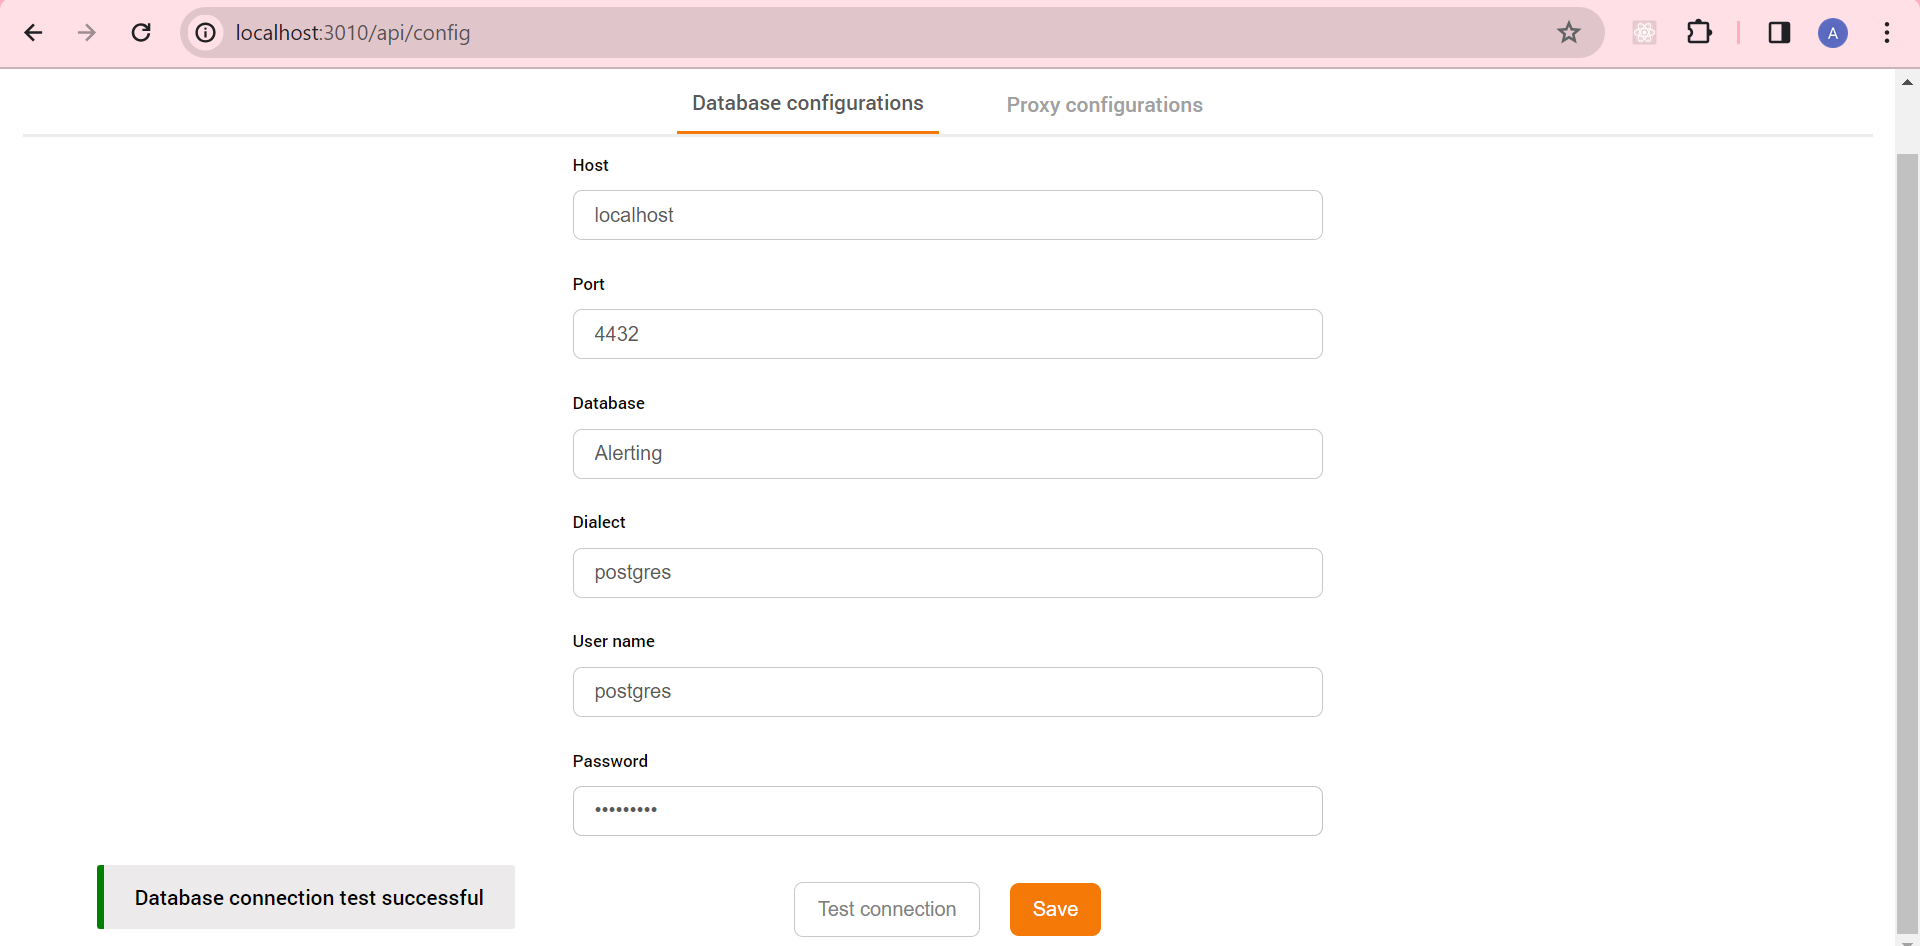
Now open the following link http://localhost:3010/api/config
Database Config - The above URL will take you to fill the database form.You can use an existing Postgres database with Qlik Repository to construct a database, or use a different Postgres instance aviable. After enter the necessary information click on the Test Connection button and After it get success click on the Save Button.
● Database Host Name   -  localhost/Custom hostname

● Database Port No     -  4432/Custom port

● Datbase Username     -  Username of postgres

● Datbase Password     -  QS Repository Password/Postgres Password
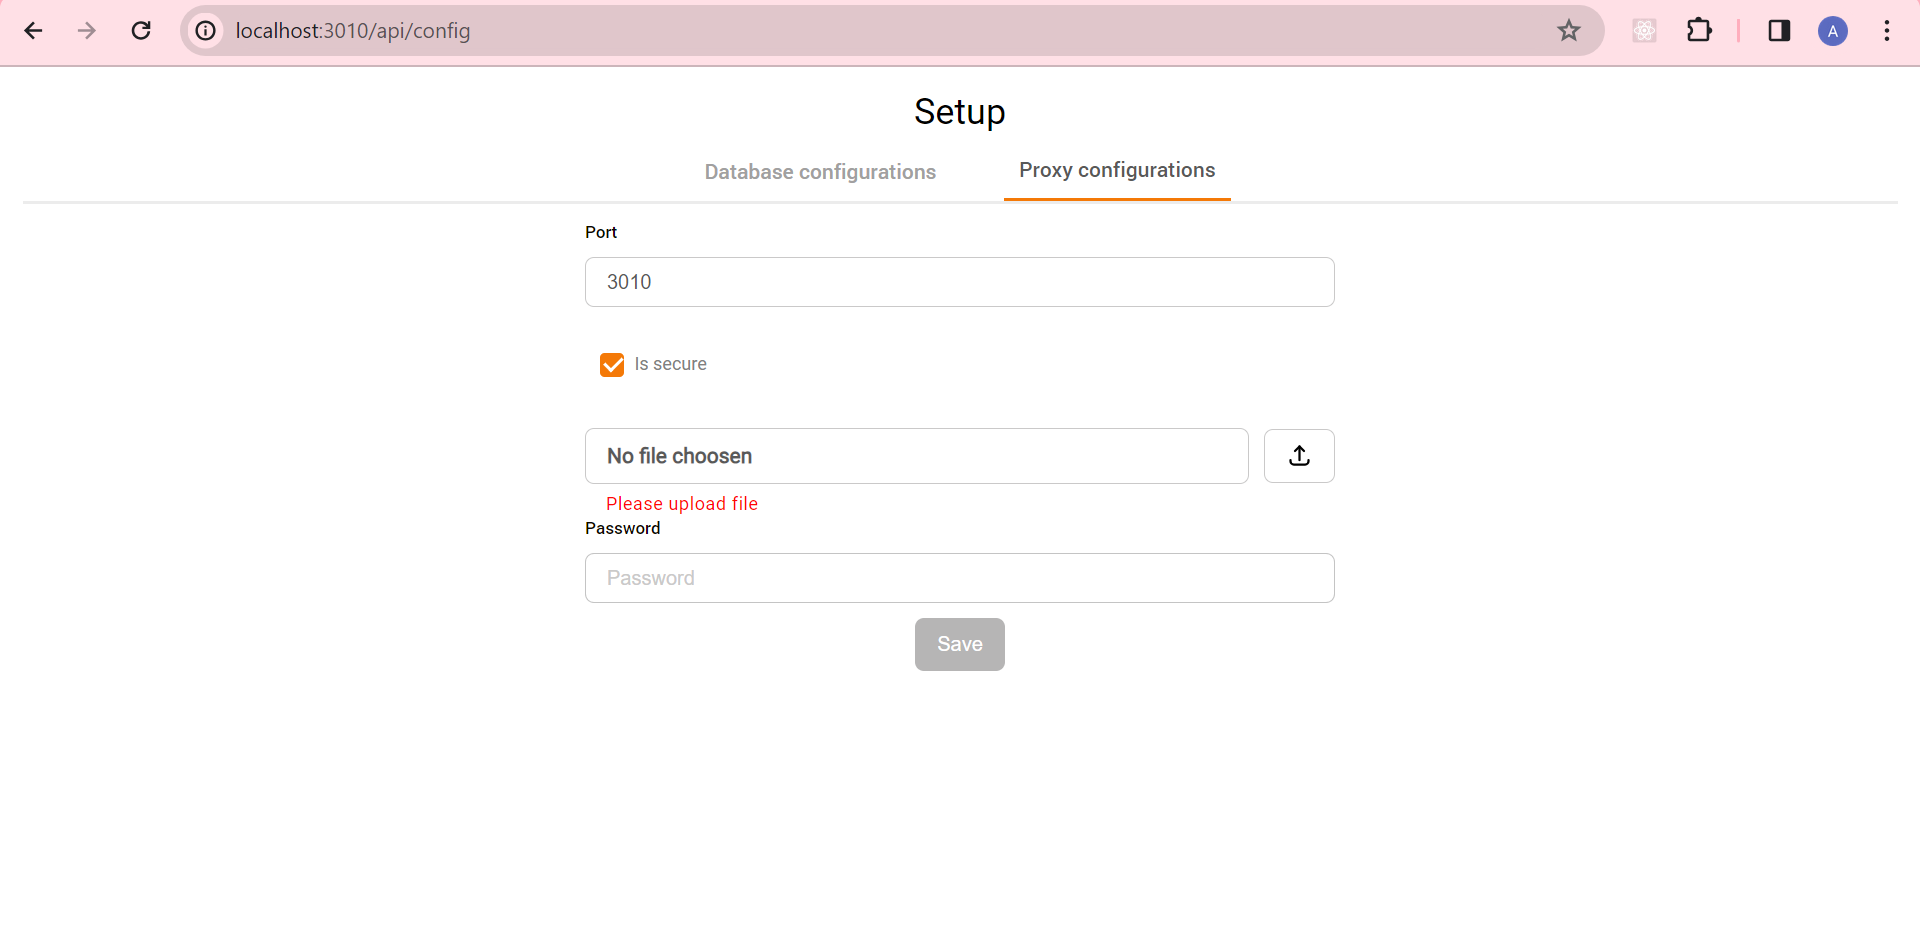
SSL Certificate - Upload
- If alerting need to access the https outside the network user to need to upload the SSL certifcate and along with the key or password for that certificate and along with that need to open 4000 port need to be opened in the firewall.
- After saving all configurations, it's important to restart the service to apply the changes.This ensures that the service picks up the updated configurations and operates with the newly configured settings.

Step 4:
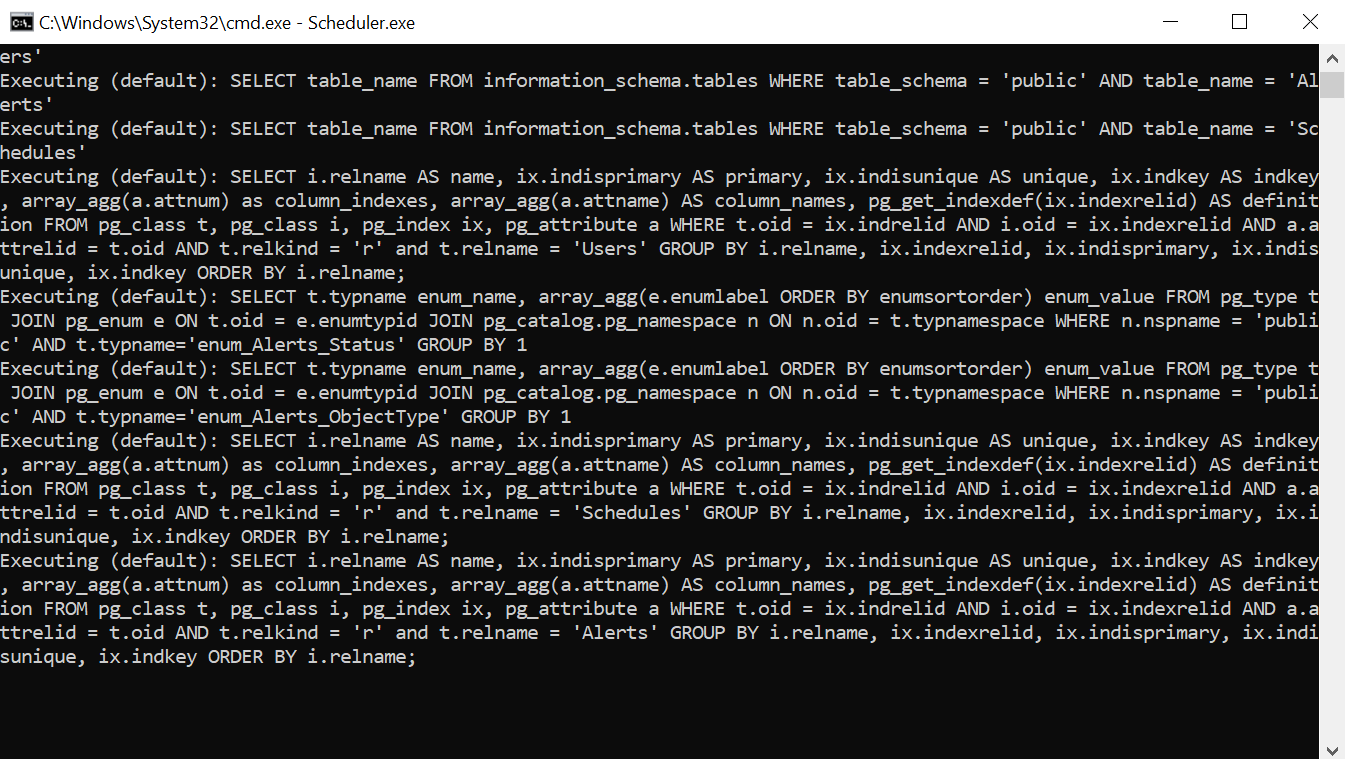
SenseOps Alerting - Scheduler Installation
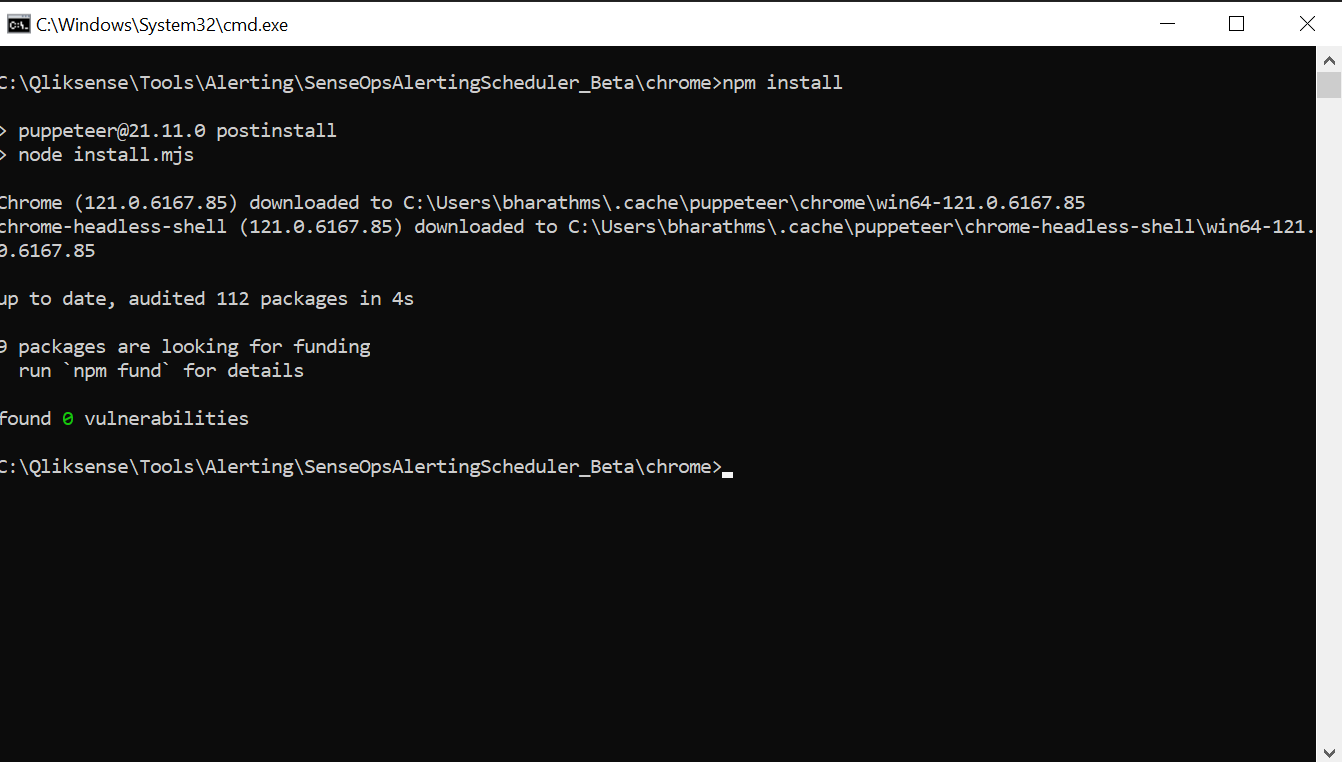
- Go to the file path: QlikShare/Tools/SenseOps Alerting/SenseOpsAlertingScheduler_Beta/chrome, open the command prompt with administrator privileges, type npm install and hit Enter. After executing the command, the Chrome driver will be downloaded and saved in the cache file.
-
Once the Chrome driver is downloaded, follow these steps:
Type the command cd .. and hit Enter to navigate back one directory.Then, type the command Scheduler.exe and hit Enter to run the Scheduler service.Make sure you are in the correct directory containing the Scheduler.exe file before running the command.

Now open the following link http://localhost:3011/api/config
Database Config
To set up the database, follow these steps:
- Navigate to the provided URL to access the database form.
- Fill in the necessary information in the form. You can either:
- Use an existing Postgres database with Qlik Repository to construct a database, or
- Use a different Postgres instance if available.
- Once you've entered the information, click on the Test Connection button to verify that the connection to the database is successful.
-
If the test connection is successful, click on the Save button to save the database configuration.
● Database Host Name - localhost/Custom hostname
● Database Port No - 4432/Custom port
● Datbase Username - Username of postgres
● Datbase Password - QS Repository Password/Postgres Password

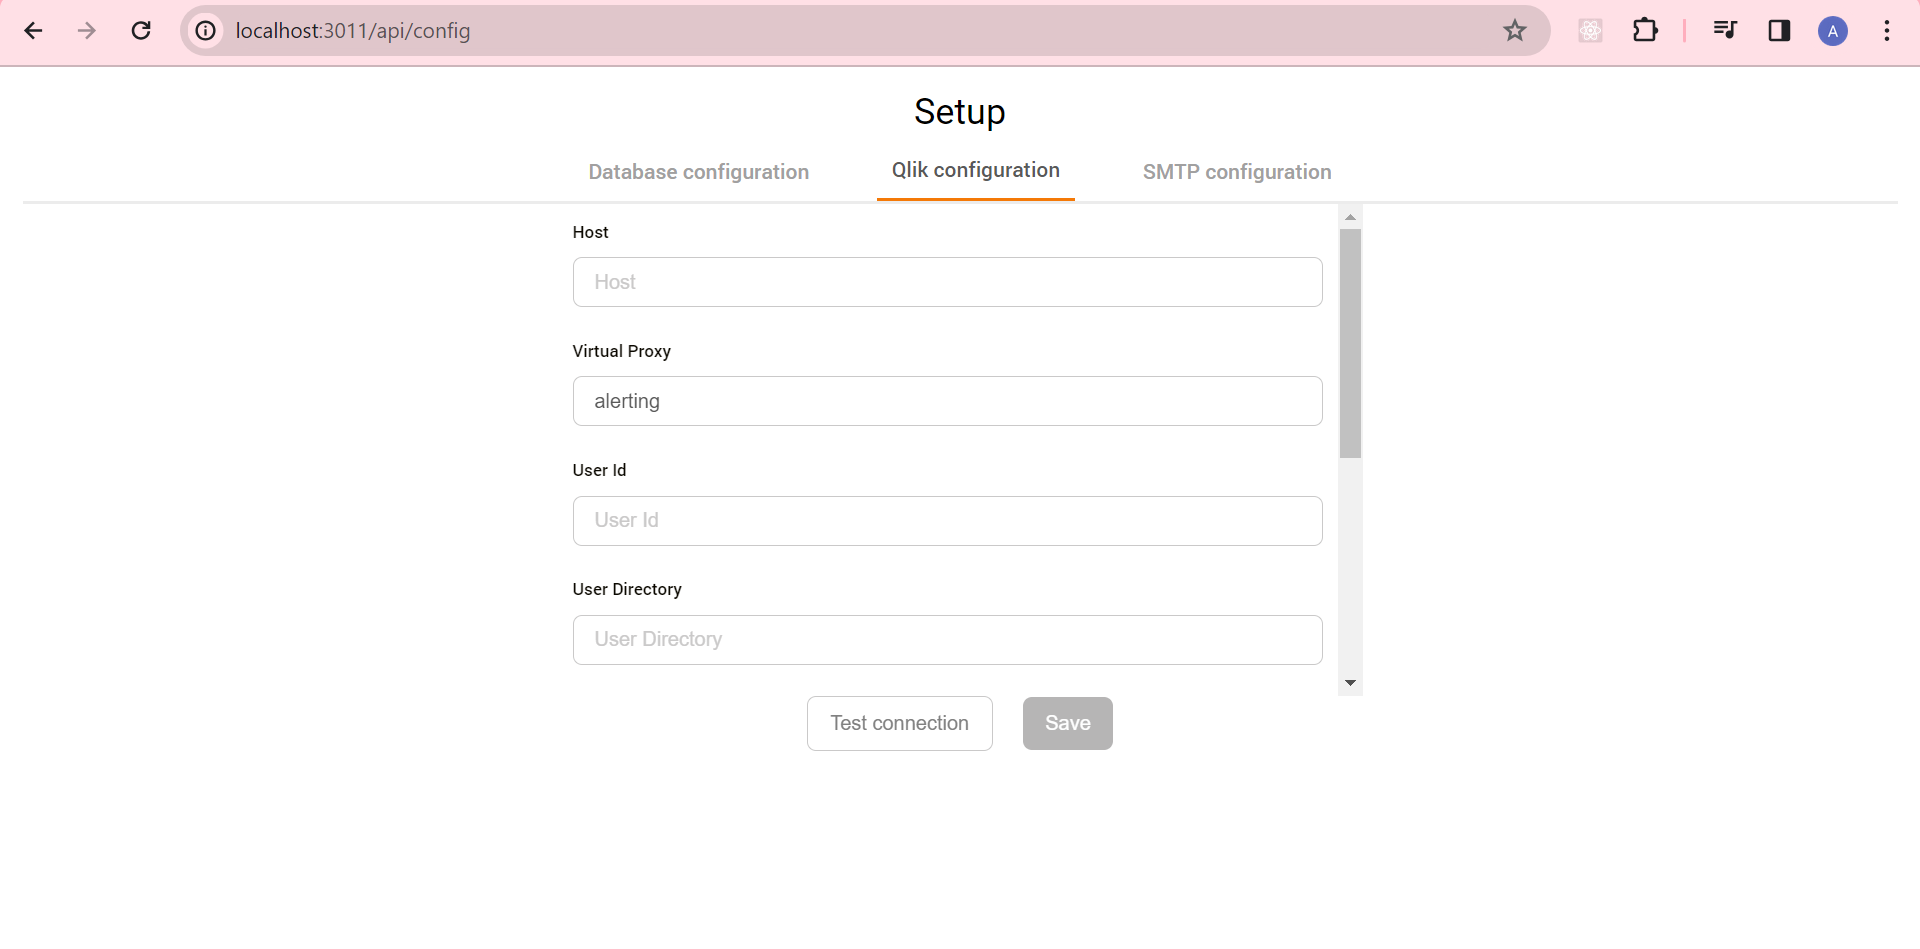
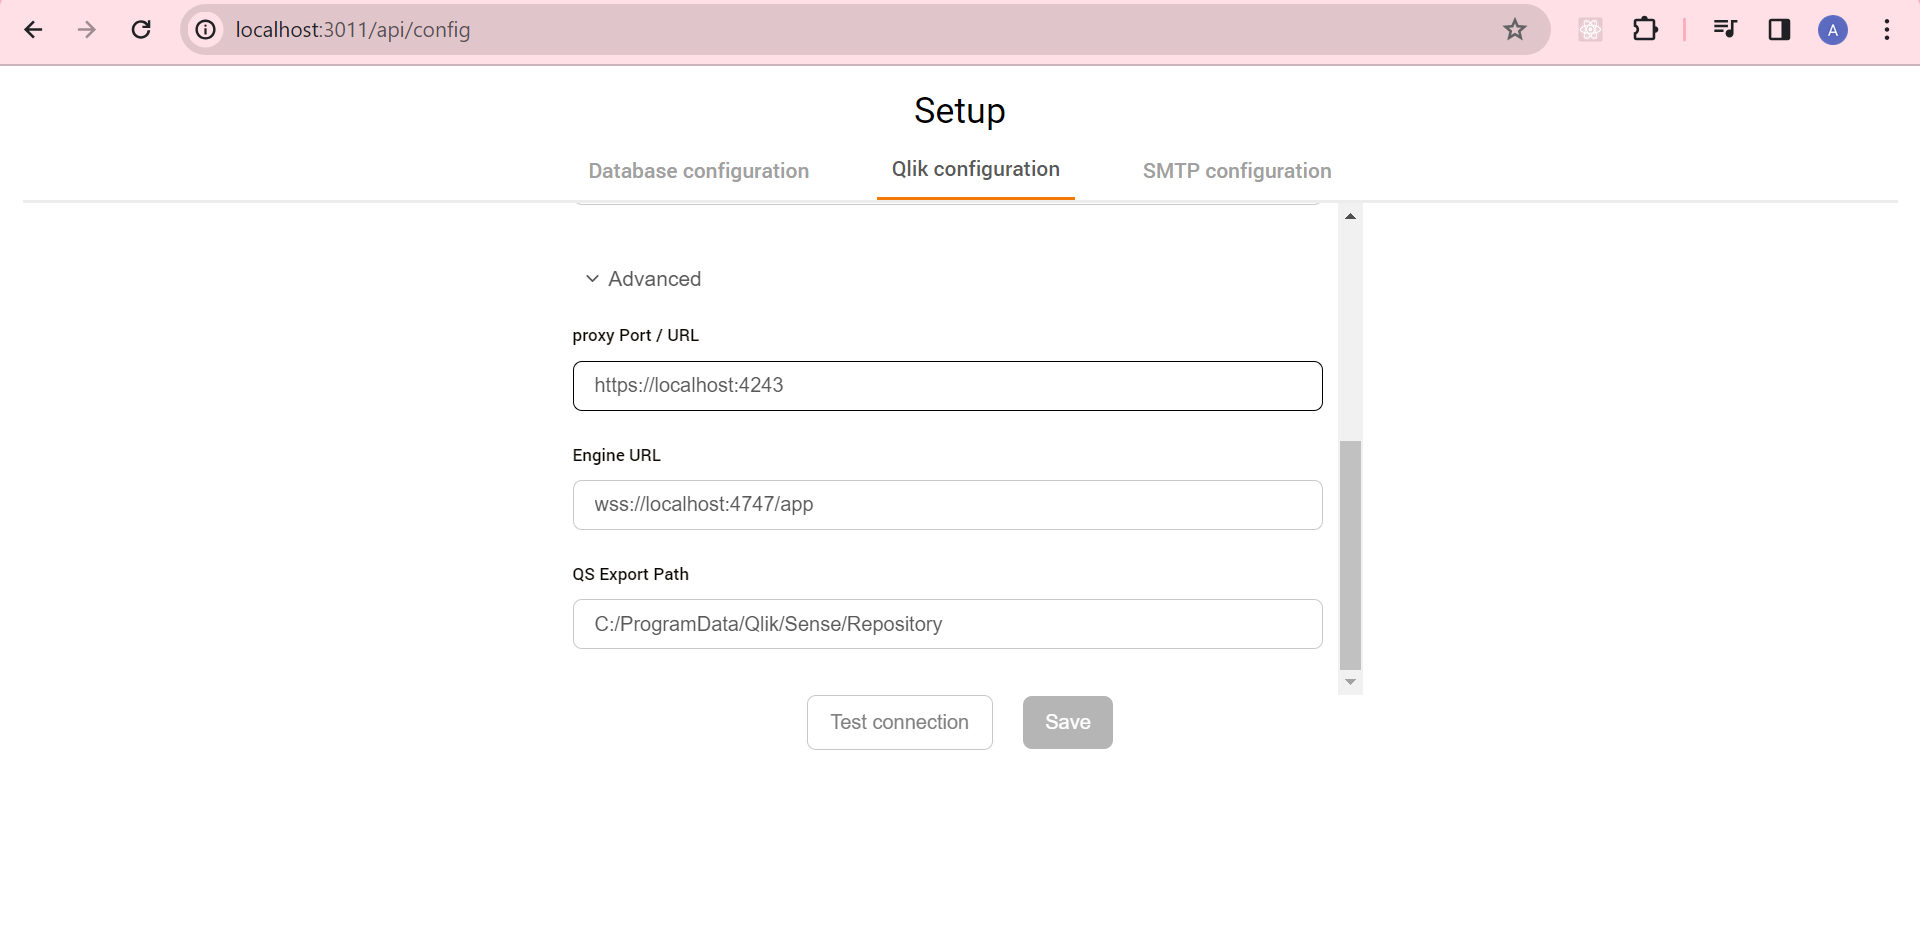
Qlik Sense Config
After saving the database configuration, proceed to configure Qlik Sense by following these steps:
- Click on the Qlik Configuration tab to access the Qlik Sense configuration details.
- Fill in the following information:
- Host Name: Enter the hostname or IP address of your Qlik Sense server.
- Virtual Proxy: Provide the virtual proxy used for alerting.
- Qlik User ID: Enter the user ID used for authentication with Qlik Sense.
- User Directory: Specify the user directory associated with the Qlik User ID.
- In the Advanced section, provide the proxy URL in the format:
https://<Host>:4243, where<Host>is the hostname or IP address of the Qlik Sense server. - After entering all the necessary information, click on the Test Connection button to verify the connection to Qlik Sense.
- If the test connection is successful, click on the Save button to save the Qlik Sense configuration.
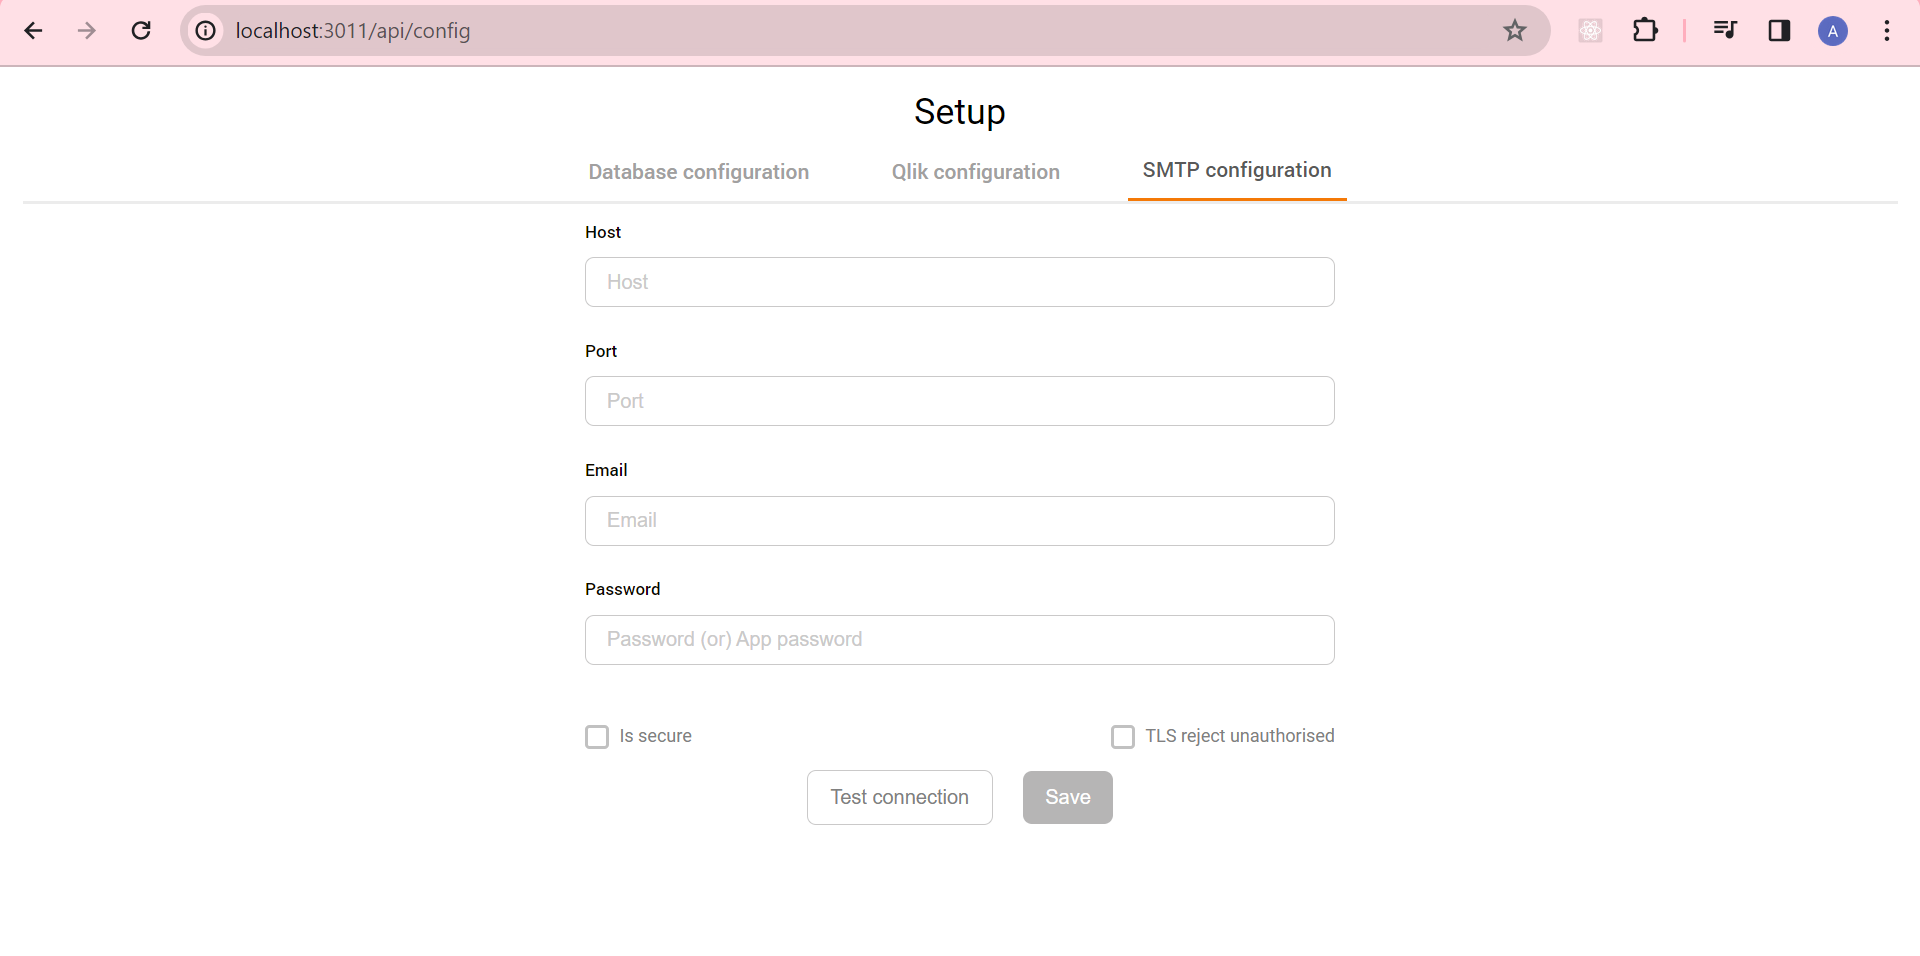
SMTP Config
Once you've saved the Qlik Configuration, proceed to configure SMTP settings by following these steps:
- Click on the SMTP Configuration tab to access the SMTP configuration details.
- Fill in the following information:
- Host: Enter the hostname or IP address of your SMTP server.
- Port: Specify the port number used for SMTP communication.
- Email: Provide the email address that as used as from email Id.
- Password or App Password: Enter the password or app-specific password associated with the email account. If using two-factor authentication, generate and use an app-specific password.
- Is Secure: Specify whether the SMTP connection should be secure (e.g., SSL/TLS).
- TLS Reject Unauthorized: Indicate whether to reject unauthorized connections when using TLS.
- After entering all the necessary information, click on the Test Connection button to verify the SMTP details.
- If the test connection is successful, click on the Save button to save the SMTP configuration.
Ensure that you have the correct SMTP server details and authentication credentials to successfully send emails from the SenseOps Alerting.
- After saving all configurations, it's important to restart the service to apply the changes.This ensures that the service picks up the updated configurations and operates with the newly configured settings.
Installation is successful. Now you're all set to Create your alerts.
Creating Alert
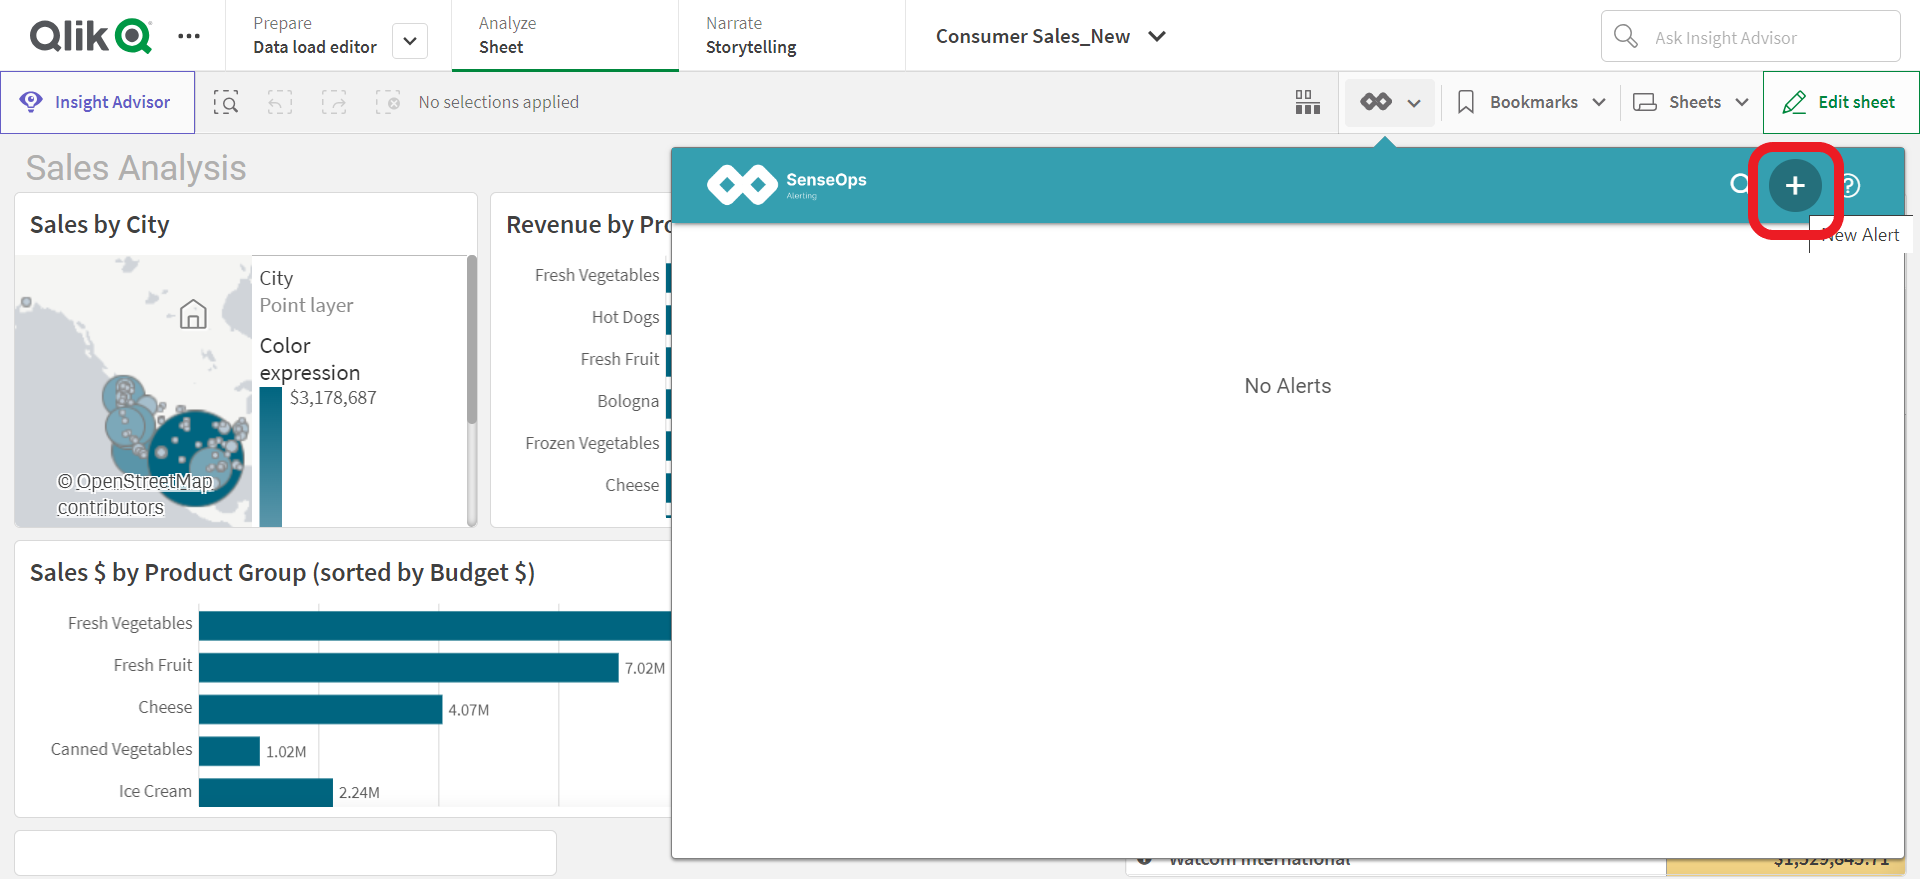
Step 1:
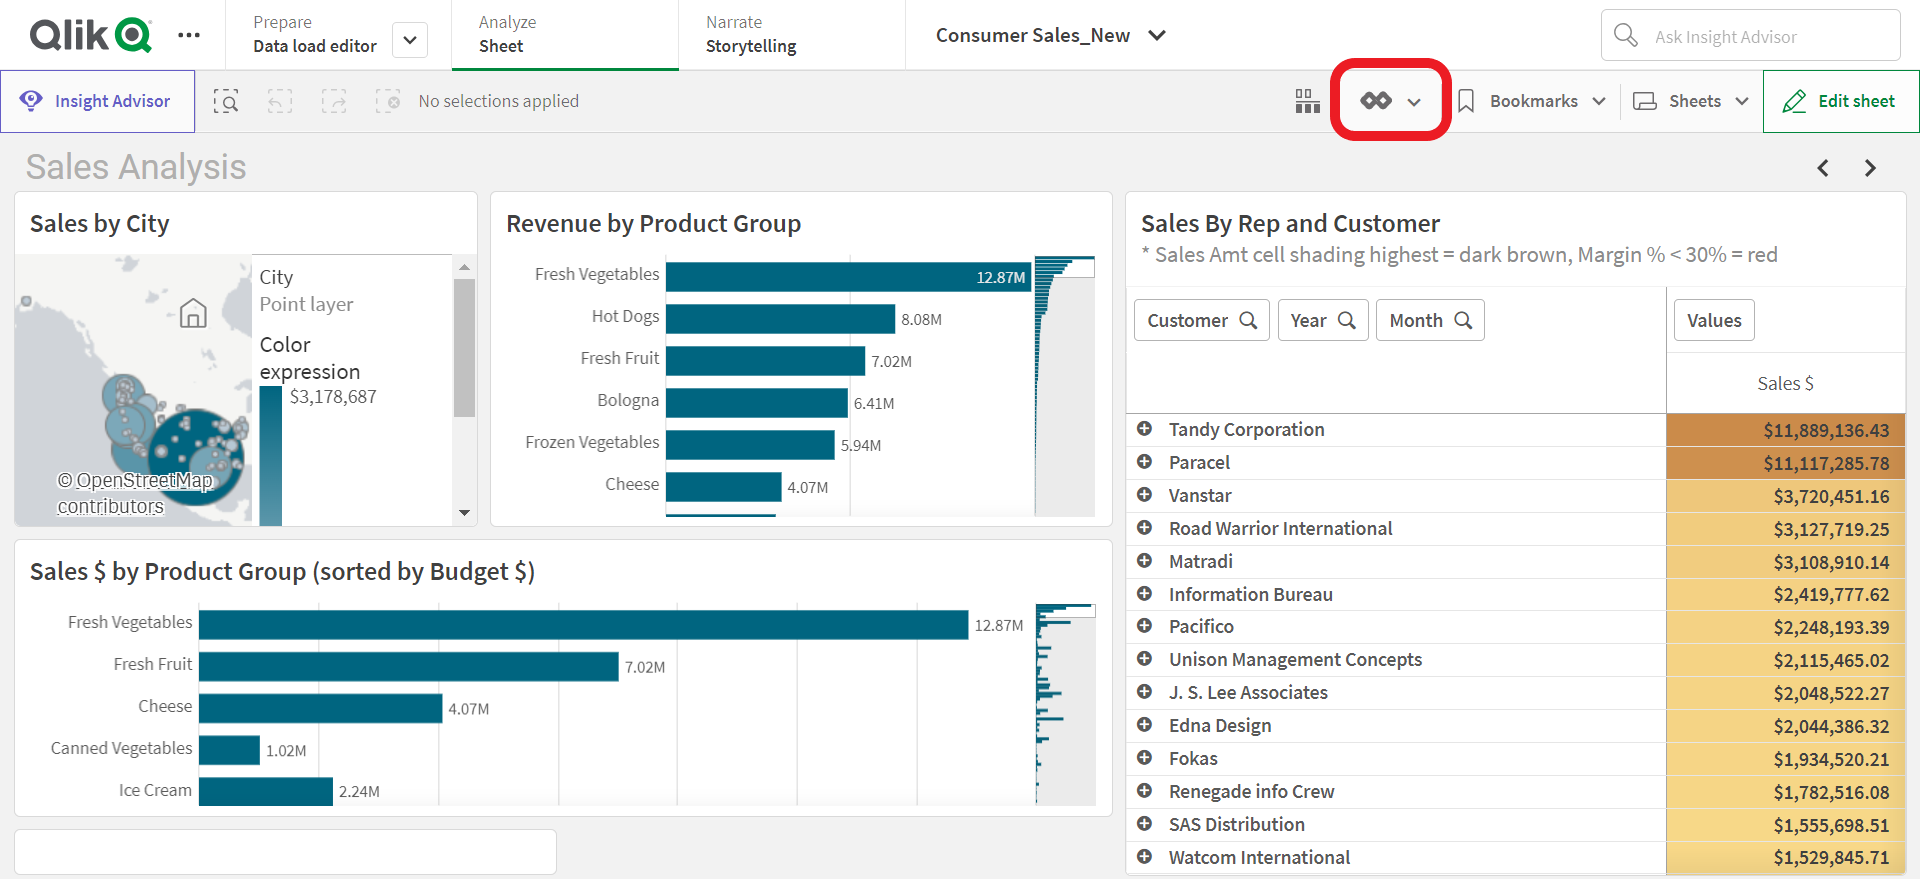
To access Senseops alerting, simply click the alert icon in the top right corner of the screen, as seen below. The alert popup screen will appear after this action.
Step 2:
When you click on the plus (+) icon in the top right corner of the alerting popup screen, you will be taken to the Create Alert screen.
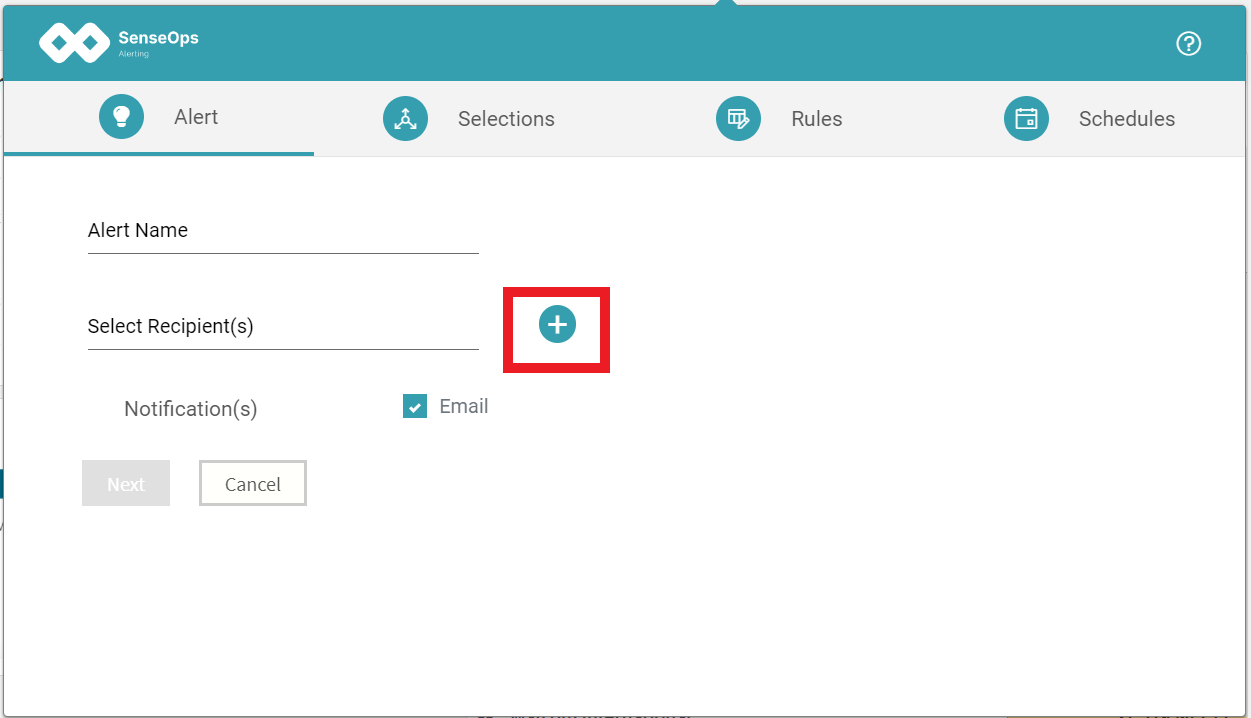
Step 3:
To add new recipients, click the plus (+) symbol next to the Select Recipient(s). This will open the Create New User popup screen.
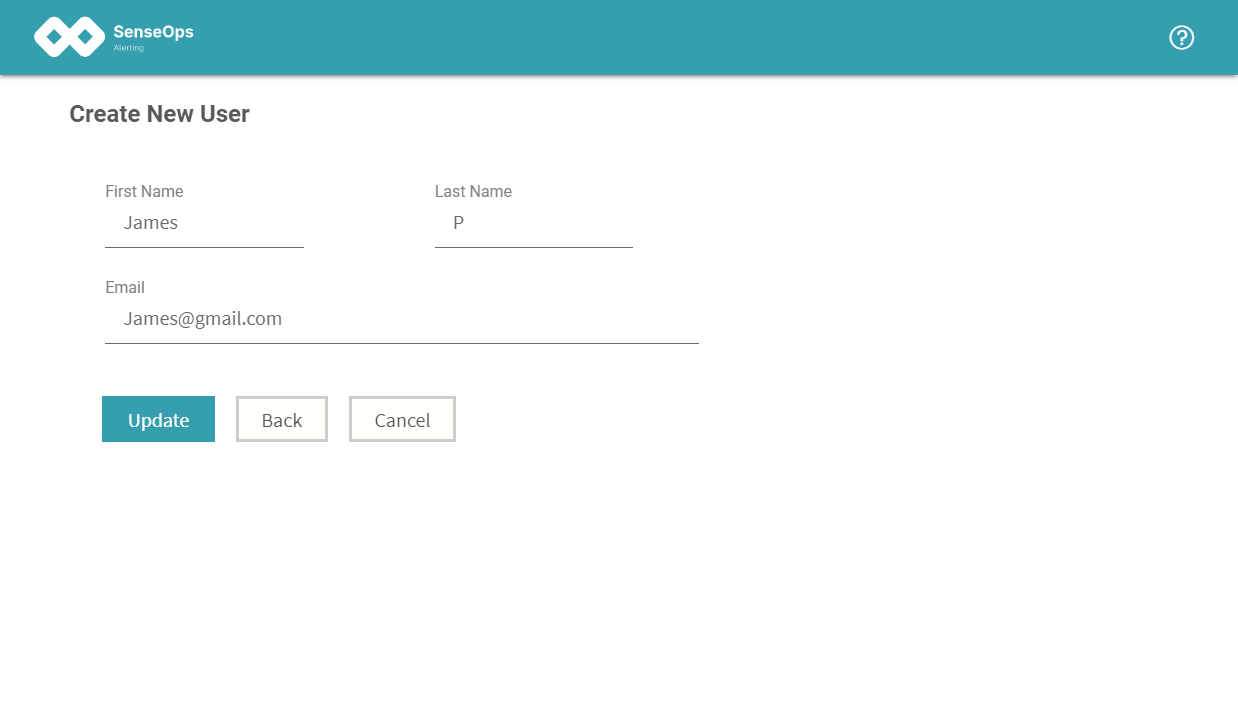
Step 4:
Enter the First Name, Last Name and Email Id in the appropriate textbox's and click on the Create button it will create the user and if need to add more users do the same thing.
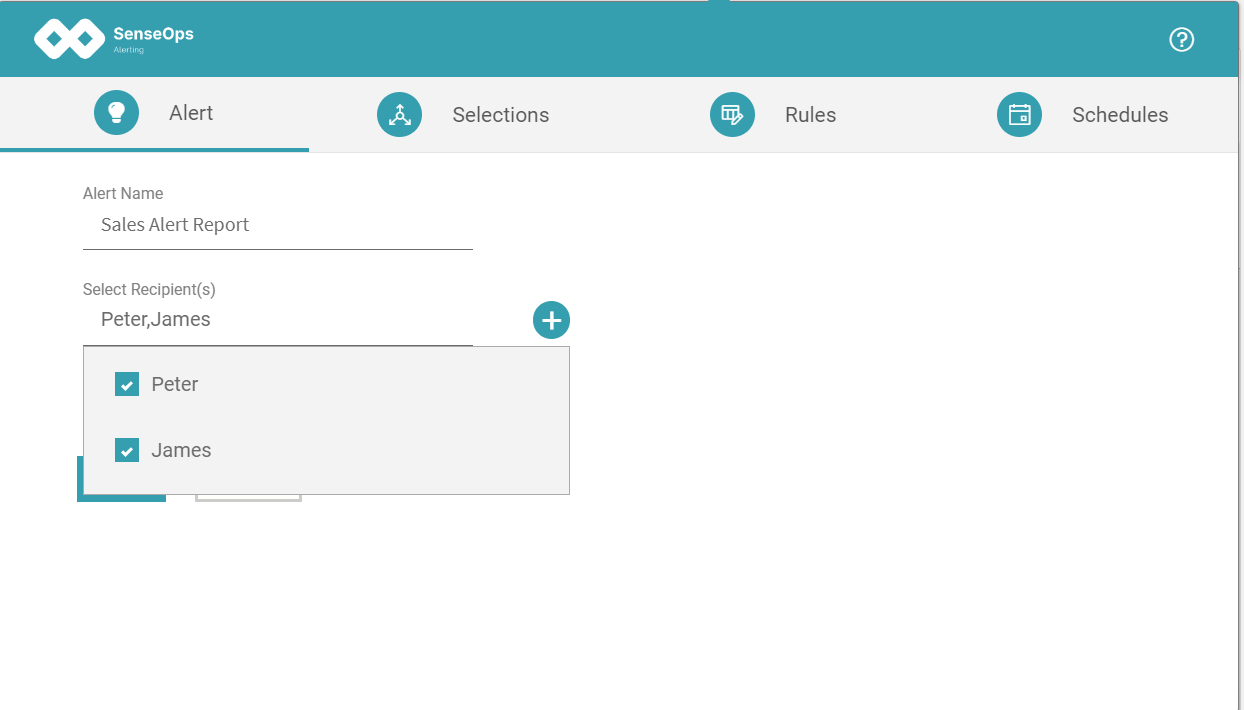
Step 5:
After creation of the users email id's it will take to the Create Alert screen. After entering the alert's name and selecting the recipients in the Select Recipient(s) list check box, choose one or more recipients from the list, and then click the Next button.
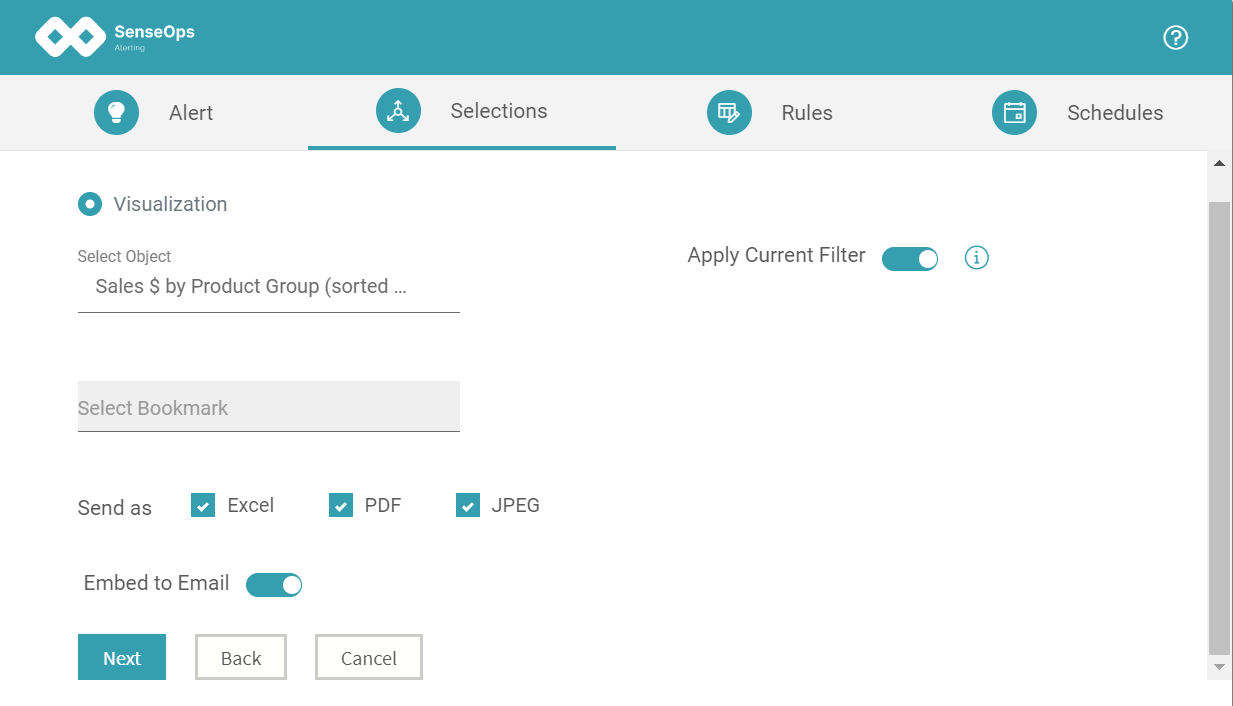
Step 6:
After navigating to the selections tab, you'll need to choose the desired object from the specific Qlik Sense application in the Select Object dropdown menu. If you wish to apply bookmarks to the selected object, deselect the Apply Current Filter option, then select the desired bookmark from the Select Bookmark checkbox. Alternatively, if you need to apply the current filter, enable the Apply Current Filter option. Next, specify the desired attachment format for the email, such as Excel, PDF, or Image. If you want to embed an image within the email, select the Embed to Email option. Finally, click on the Next button to proceed.
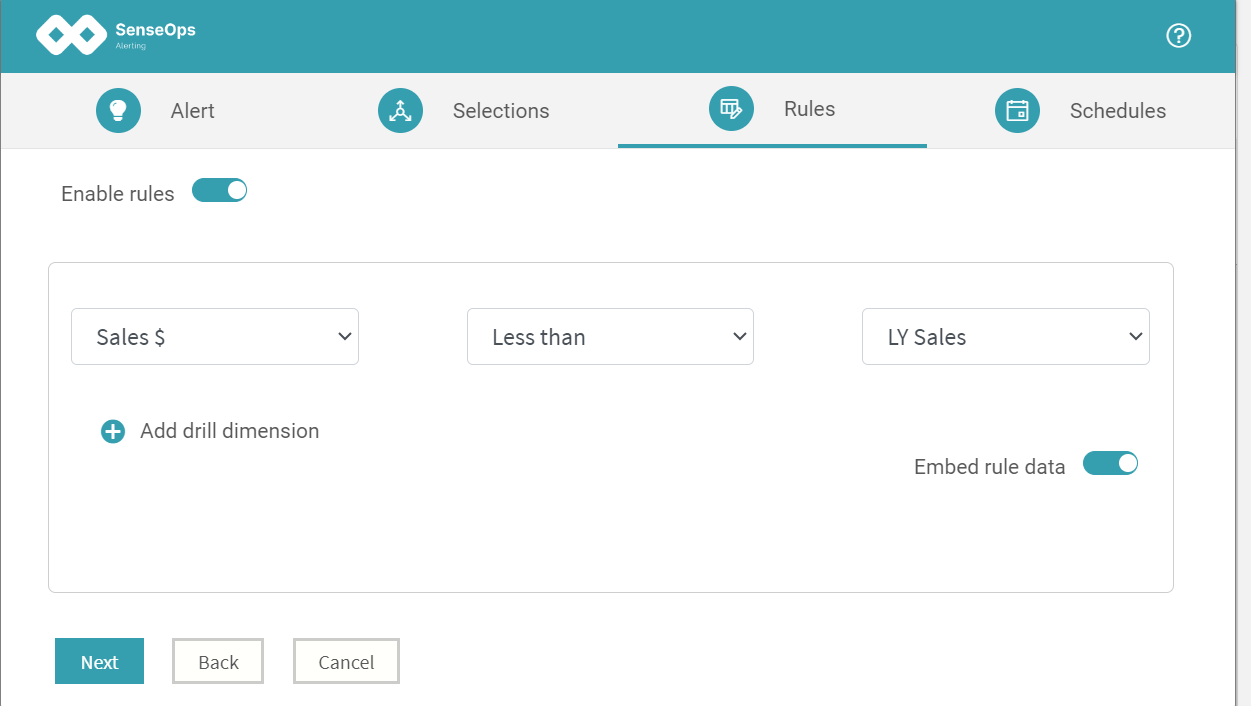
Step 7:
Next, if you need to configure rules for the alert, enable the 'Enable Rules' button and define all the necessary conditions and click on the Next button.
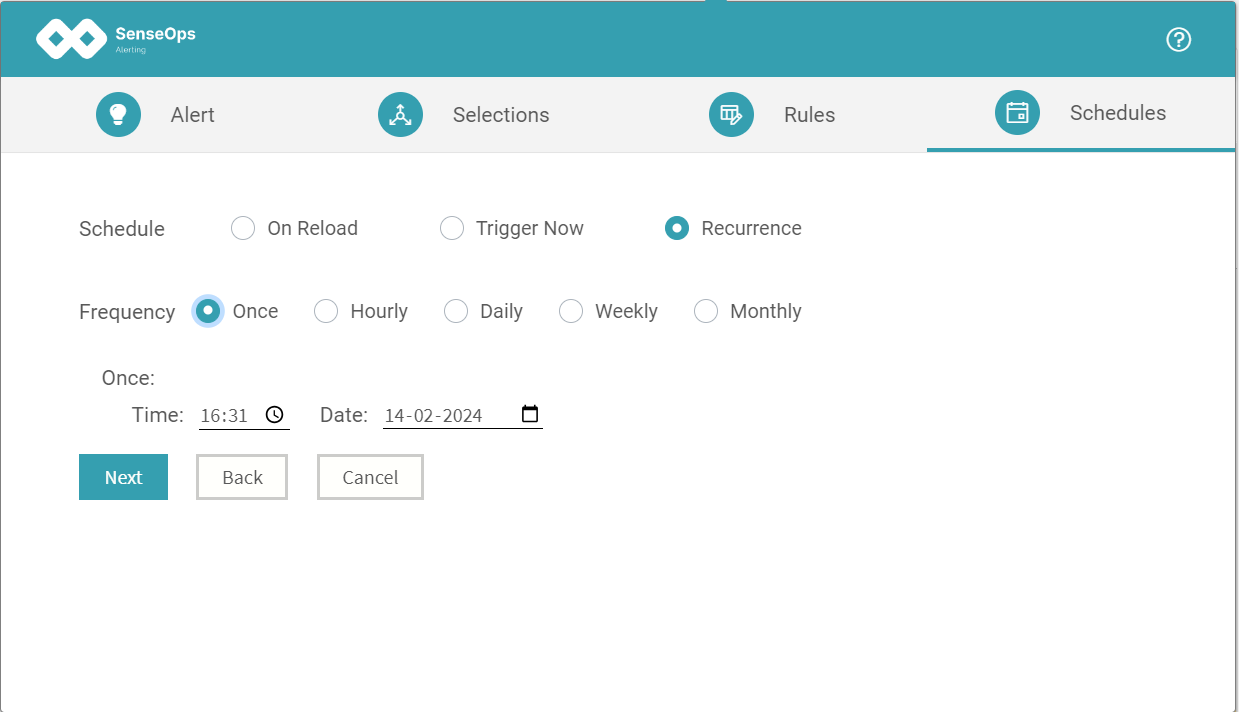
Step 8:
After clicking the Next button, you'll be directed to the Schedules tab where you can configure the schedule using three options: On Reload (the alert email will be sent once the application is reloaded), Trigger Now (the alert email will be sent instantly), and Recurrence (the email will be sent based on the user-defined time) and select schedule for alert and click on the Next button.
Step 9:
After clicking the Next button, you'll be directed to the preview screen where you can view the object preview and also compose a message for the alert. Once done, simply click on the Save button to finalize.
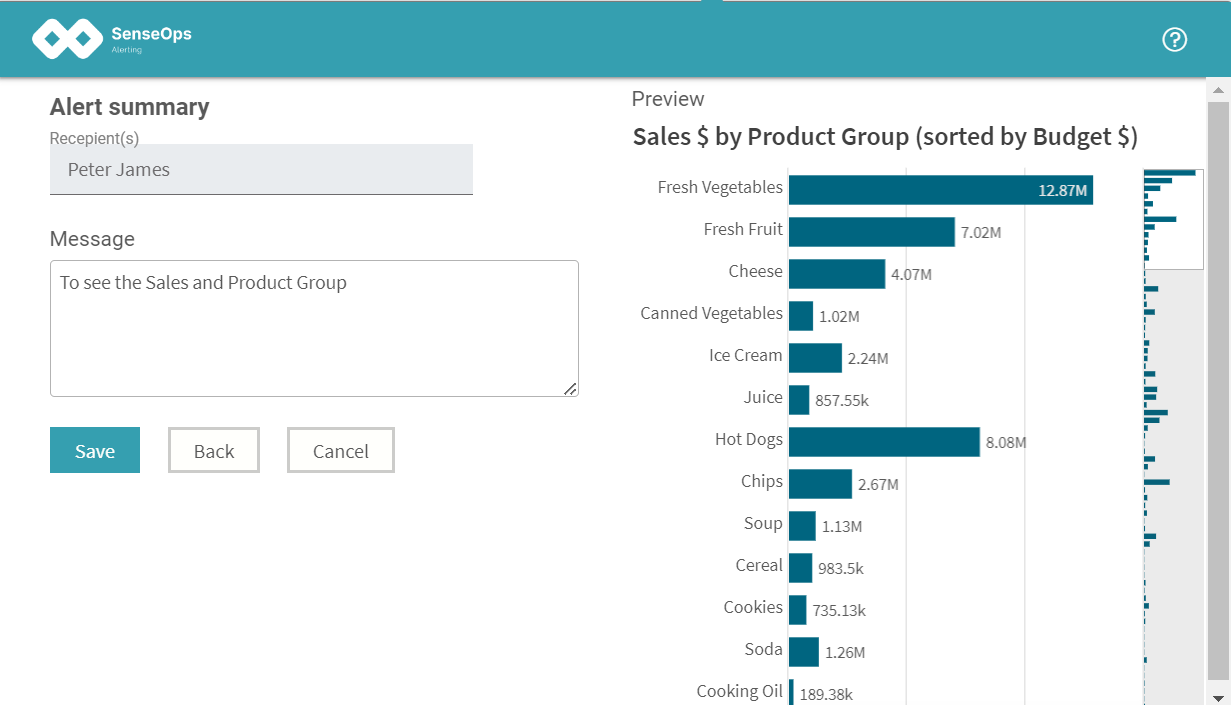
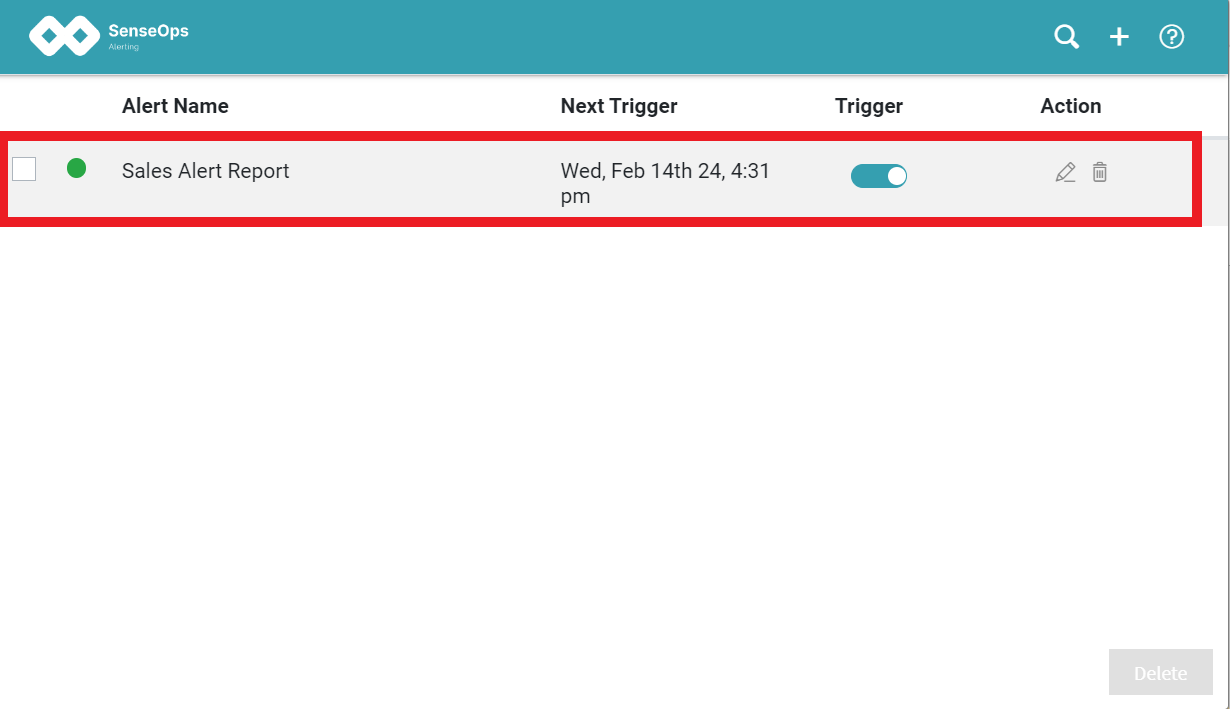
● After clicking the Save button, the alert will be saved, and emails will be received based on the specified selections.
Quick video - How to use the SenseOps alerting ?
The short video below will explain how to utilize the alerting feature in Qlik Sense.